Did you know that you can navigate the posts by swiping left and right?
Fabricating a Dog Harness using 3D Scanning and Crochet
07 Apr 2018 . Category . Comments #hardware #dogs
Shiloh recently turned 10 and had TTA surgery on both rear legs last year. Each surgery had an 8-12 week recovery period with activity restriction, physical therapy, and highly structured increases in activity. Because our house has steps up and down, we purchased a support sling to help her get in and out of the house and generally support her when we did these structured walks. But it wasn’t quite right.
Shiloh has a very deep chest, meaning she’s about twice as big around behind her front legs as she is in front of her rear legs. As a result, the sling we bought would gather right in front of her rear legs instead of laying flat. That means that instead of her weight being distributed across a 6 inch surface, her weight was distributed across a 2 inch surface.
I looked around and was unable to find a product that I thought would work given the specific requirements:
- Lift at rear legs
- Distribute weight over as much of belly/chest as possible
- Be easy to put on/off
The closest products I found were of the rappelling/parachuting variety, but these either bind up the dog excessively (not meant for walking), are tricky to put on (leg loops!), or have handles at the shoulder rather than the back end.
So I decided to build one (or three).
Mark 1
I made basic design decisions with the Mark 1 even though it ended up not being viable:
- To distribute weight and have a custom fit, I 3D scanned Shiloh ($85 scanner on Ebay, 3D Systems 350431 iSense for iPad Air 2)
- To generate a pattern, I used 3D modeling tools
- To fabricate, I used crochet with 550lb rated paracord
3D scanning worked better than I expected, though consistent with reviews. I put Shiloh in a stand/stay and walked around and passed the scanner/ipad underneath her. She moved her head and tail, so I lost volume there, but those features were irrelevant to the design. Probably the hardest part was getting the scan data off using iTunes.
My original plan was to import the model directly into free software that would help me design a pattern. Unfortunately, though I tried a number of programs, none of them worked (either they did not function at all or did not have the functionality to take my model, design a pattern on it, and export a pattern). Here are a list of the things I looked at/tried:
What I ended up doing was more low level, loosely related to this MAKE post. Bascially you take your model and do an UV unwrap on it to get a “pattern” though the pattern is now dimensionless. I did this in Blender, creating seems along the top line and around legs.

Once you have the unwrap, you can export it as an image. Of course the image is all meshy; what we want is to have a clean background and foreground. Also we need to scale it up. I did the scaling by a tape measure around Shiloh (so much for millimeter accuracy). In hindsight, I should have scanned with a calibration object for this purpose. The pattern was created in gimp by messing with inversions and alpha channels.

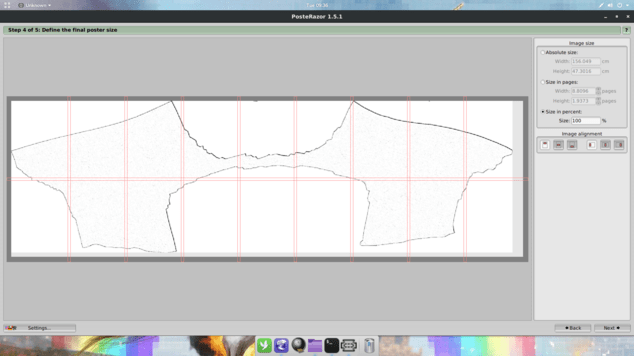
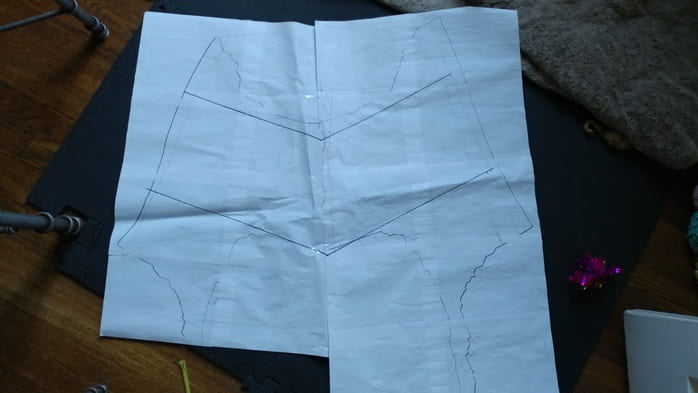
Finally I needed to print the pattern, which was huge, to have a guide while I was fabricating. I used a print tiling program to do this with letter size paper.
I started crocheting with a number 10 hook and a double stich. Having done some 3D printing, I thought crochet had a lot of similarities, so the idea appealed to me. Experience has taught me 3D printing and crochet are:
- Similar in that you are extruding/building from a single thread/spool
- Different in that crochet is one continuous line (3D printing can have breaks)
- Different in that crochet will deform/not hold its shape
- Different in that crochet cannot be cut/sanded/etc afterwords
- Different in that crochet can be “redone” by undoing stiches
My biggest lesson with the Mark 1 was the deformation issue. My pattern was very organic (cut from a 3D model) which made it impossible to count stiches and difficult to register against the piece. I didn’t even finish the Mark 1 it was so bad.

I also learned that crochet of paracord uses A LOT of material (get a 1000 foot spool or go home). Rest in piece Mark 1.
Mark 2
First I fixed the pattern issue by cutting some hard lines on my pattern. This let me register the piece against the pattern and also know that each row had the same length. A very tricky part is the reduction in the middle of the piece to account for Shiloh’s deep chest.
I added some handles that spanned the strap, and it looked beautiful.

It also looked good on:
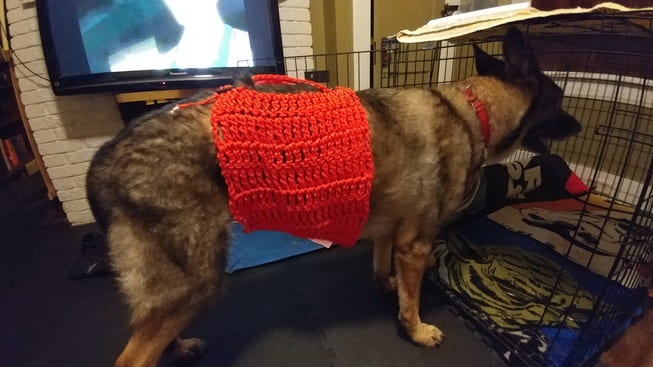
However I did not make the front strap part of my process, thinking I could add it on later. Sure I was able to do that, but it didn’t look that great.


Unfortunately the Mark 2 had some killer problems:
- It was really heavy, like 5-10 lbs heavy. Not good for a dog where weight on the back limbs is a problem
- The handle worked but caused the two ends to come together, so weight was not being distributed well
So I killed the Mark 2 and started the Mark 3. See a pattern yet?
Mark 3
My major goals with the Mark 3 were to reduce the weight and integrate the front strap. Basically the harness would be like a net except underneath Shiloh, where it would be denser to more evenly distribute weight. It occured to me that this design didn’t need handles because you can grab net from any direction.
Because I had to use different stitches, the Mark 3 was a lot harder than the Mark 2. Especially in the middle part with the reduction, where a half dozen different size stiches are needed to make that happen. Again, this is one continuous piece of string.


The Mark 3 also has a few issues. Somehow it’s a bit bigger around than I intended, so I’ve had to zip tie the buckles to try to offset. Because the pattern is tighter in the middle than the sides, I can’t just take it in on one side - I would have to unravel it almost entirely and restitch. The weight is OK now, but it seems the looser stitch makes it stretch a lot more. The top picture laid out on the floor is after about a month of use - it has stretched so much that I feel I need to do something about it. Fortunately it seems I have the option of closing the gap across a row by tying some string through it. Haven’t tried that yet though.
So what have I learned from all this? I don’t think I can recommend crochet and paracord for this application. It’s very strong, but also heavy. Fabric like balistic nylon would be lighter and easier to work with. The 3D printing for making a pattern kind of worked, but the conversion to UV coordinates lost my dimensions. It would be a lot more helpful if I could have inserted a calibration object into the scan. Perhaps there’s another way to measure in Blender (e.g. the top line) that I could have used as a proxy there. In the grand scheme of things, 3D scanning is probably more useful to make a mannequin for draping/measuring/sewing against than for creating a pattern. With a wiggly dog, especially one with mobility issues, you just can’t stand them up for constant checks. I literally made the Mark 3 without measuring against Shiloh until the buckles were ready to go on (when I realized it was a little too big). The engineering requirements have changed throughout the course of this project too. Originally I was thinking she may not be able to walk at all, so we needed a heavy duty harness to hook up charriot wheels for her back legs. Now that she’s doing better, this seems like overkill. Still using it though, because it’s better than the original sling!